目前许多大型语言模型(LLMs)还不具备获取天气预报和灾害天气预警的能力。让我们使用MCP来解决这个问题!
在本文中,我们将构建一个MCP Server,暴露两个工具(tools):get-alerts(获取预警)和get-forecast(获取天气预报)。
MCP核心概念
MCP服务器可以提供三种主要类型的能力:
- 资源(Resources):类似文件的数据,可被客户端读取(如API响应或文件内容)
- 工具(Tools):可被大语言模型调用的函数(需要用户批准)
- 提示词(Prompts):预先编写的模板,帮助用户完成特定任务
创建项目
这里将使用MCP的Python SDK来创建一个名称为weather的MCP Server。首先创建项目:
uv init -p 3.12 weather

cd weather
创建Python虚拟机环境:
uv venv
source .venv/bin/activate
安装依赖:
uv add "mcp[cli]" httpxmcp是MCP的Python SDK库,使用uv引入依赖时使用uv add "mcp[cli]"httpx是Python的一个现代化HTTP客户端库,它提供了同步和异步API来发送HTTP请求。它是一个很受欢迎的requests库的替代品,但具有更多现代化的功能。
开发MCP Server
创建weather.py文件:
from typing import Any
import httpx
from mcp.server.fastmcp import FastMCP


mcp = FastMCP("weather")

# Constants
NWS_API_BASE = "https://api.weather.gov"
USER_AGENT = "weather-app/1.0"
FastMCP类使用Python类型提示和文档字符串来自动生成工具(tool)定义,使得创建和维护MCP tool变得更加简单。
接下来,让我们在weather.py中添加辅助函数,用于查询和格式化来自美国国家气象服务(NWS_) API的数据:
async def make_nws_request(url: str) -> dict[str, Any] | None:
    """Make a request to the NWS API with proper error handling."""
    headers = {"User-Agent": USER_AGENT, "Accept": "application/geo+json"}
    async with httpx.AsyncClient() as client:
        try:
            response = await client.get(url, headers=headers, timeout=30.0)
            response.raise_for_status()
            return response.json()
        except Exception:
            return None


def format_alert(feature: dict) -> str:
    """Format an alert feature into a readable string."""
    props = feature["properties"]
    return f"""
Event: {props.get('event', 'Unknown')}
Area: {props.get('areaDesc', 'Unknown')}
Severity: {props.get('severity', 'Unknown')}
Description: {props.get('description', 'No description available')}
Instructions: {props.get('instruction', 'No specific instructions provided')}
"""
实现工具执行,工具执行处理器负责实际执行每个工具的逻辑。让我们添加它:
@mcp.tool()
async def get_alerts(state: str) -> str:
    """Get weather alerts for a US state.

    Args:
        state: Two-letter US state code (e.g. CA, NY)
    """
    url = f"{NWS_API_BASE}/alerts/active/area/{state}"
    data = await make_nws_request(url)

    if not data or "features" not in data:
        return "Unable to fetch alerts or no alerts found."

    if not data["features"]:
        return "No active alerts for this state."

    alerts = [format_alert(feature) for feature in data["features"]]
    return "\n---\n".join(alerts)


@mcp.tool()
async def get_forecast(latitude: float, longitude: float) -> str:
    """Get weather forecast for a location.

    Args:
        latitude: Latitude of the location
        longitude: Longitude of the location
    """
    # First get the forecast grid endpoint
    points_url = f"{NWS_API_BASE}/points/{latitude},{longitude}"
    points_data = await make_nws_request(points_url)

    if not points_data:
        return "Unable to fetch forecast data for this location."

    # Get the forecast URL from the points response
    forecast_url = points_data["properties"]["forecast"]
    forecast_data = await make_nws_request(forecast_url)

    if not forecast_data:
        return "Unable to fetch detailed forecast."

    # Format the periods into a readable forecast
    periods = forecast_data["properties"]["periods"]
    forecasts = []
    for period in periods[:5]:  # Only show next 5 periods
        forecast = f"""
{period['name']}:
Temperature: {period['temperature']}°{period['temperatureUnit']}
Wind: {period['windSpeed']} {period['windDirection']}
Forecast: {period['detailedForecast']}
"""
        forecasts.append(forecast)

    return "\n---\n".join(forecasts)
最后加上启动mcp server的代码:
if __name__ == "__main__":
    # Initialize and run the server
    mcp.run(transport="stdio")
使用MCP Server
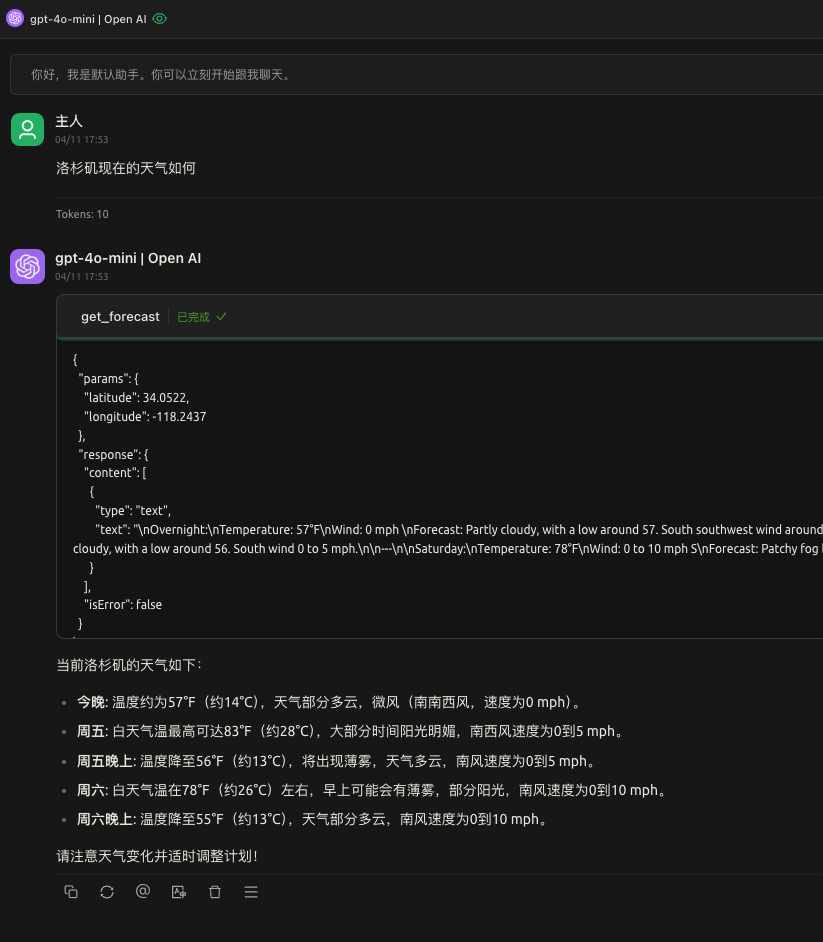
如上图所示,我将在Cherry Studio中使用刚刚开发的MCP Server。Cherry Studio是一款功能强大的桌面客户端,支持多种大语言模型(LLM)服务商,完美兼容Windows、macOS和Linux操作系统。由于Cherry Studio已经内置了MCP Client,我们只需在Cherry Studio中配置并启动我们刚刚开发的MCP Server,即可无缝集成这些功能。
{
  "mcpServers": {
    "aPS_XksxKP-paDOrI1zqP": {
      "name": "weather",
      "type": "stdio",
      "description": "",
      "isActive": true,
      "registryUrl": "",
      "command": "uv",
      "args": [
        "--directory",
        "/ABSOLUTE/PATH/TO/PARENT/FOLDER/weather",
        "run",
        "weather.py"
      ]
    }
  }
}
注意
上述配置是Cherry Studio在添加MCP Server时自动生成的专用配置格式。其他集成了MCP Client的ChatBot、IDE(如Cursor编辑器)可能使用不同的配置文件格式,请参考相应工具的官方文档进行配置。
在Cherry Studio中需要选择支持Tool Calling的模型,这里使用的是gpt-4o,具体效果如下图所示: