Terminal v1
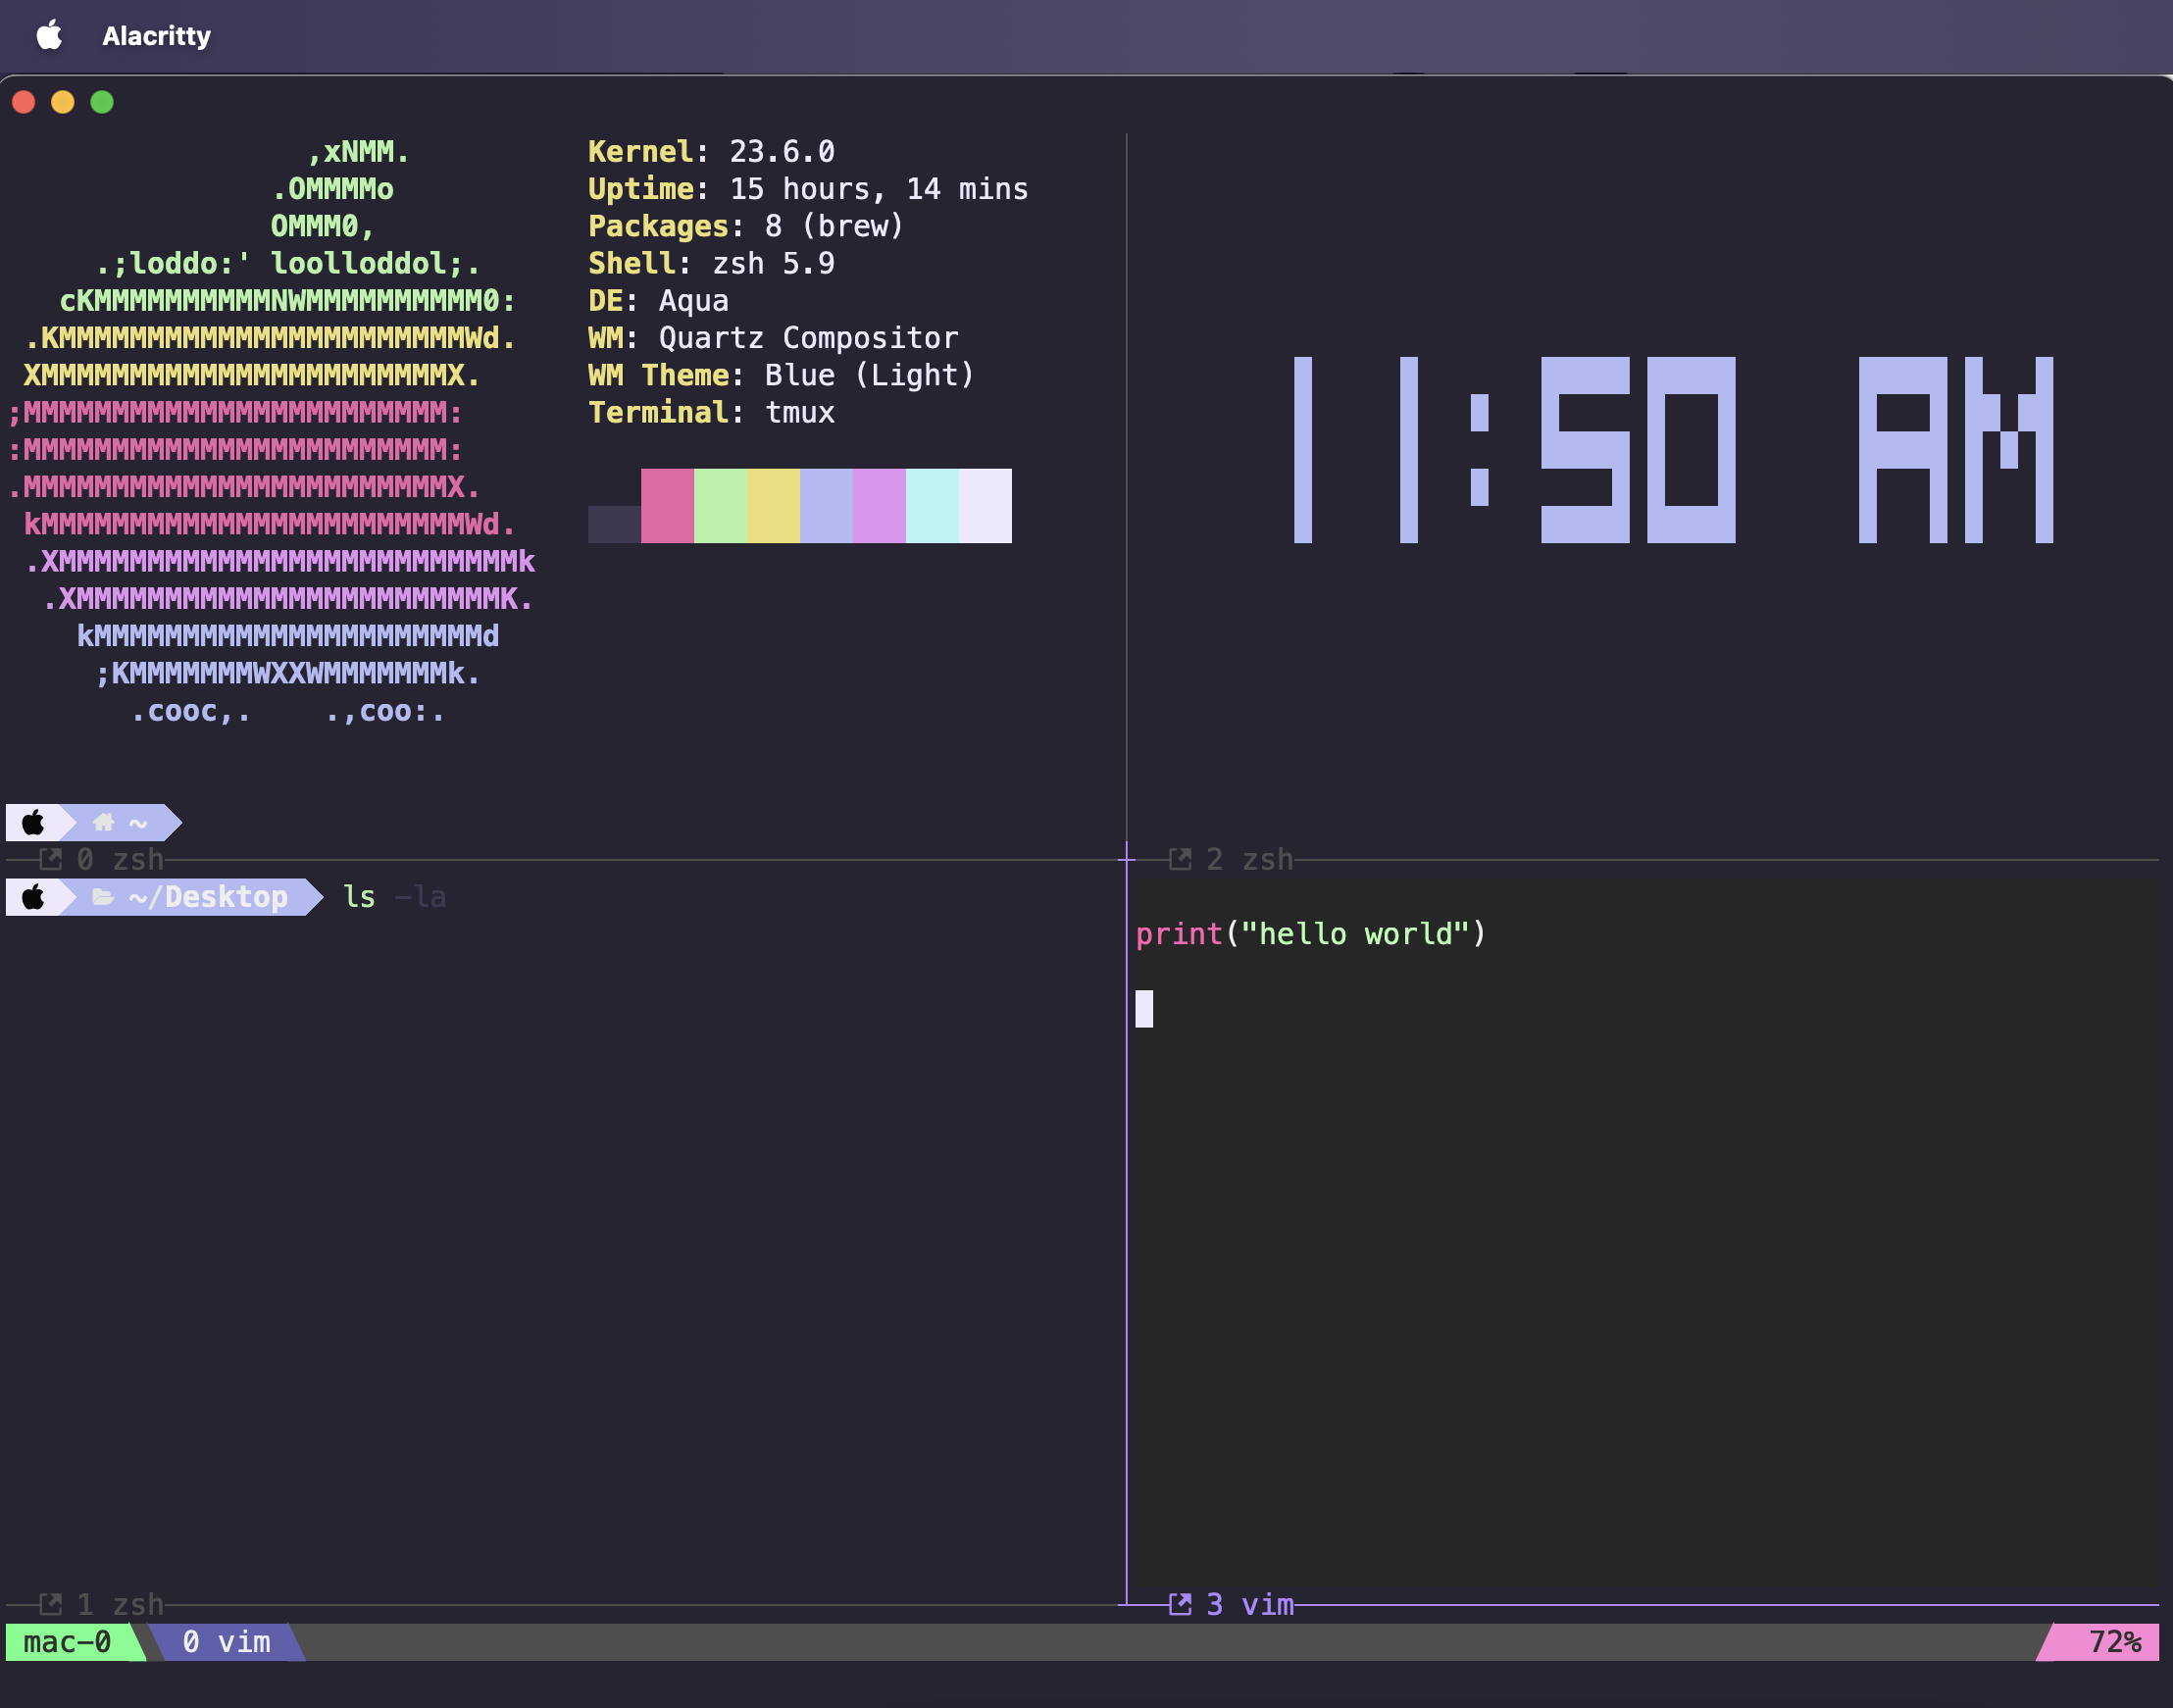
基于分层架构打造高效美观的终端环境:Shell (zsh + oh-my-zsh) + Prompt (powerlevel10k) + Terminal Emulator (Alacritty) + Multiplexer (tmux),效果图如下。
1. Shell 层:zsh + oh-my-zsh
1.1 安装 zsh 和 oh-my-zsh
1.1.1 安装 zsh
macOS:
- macOS Catalina (10.15) 及更高版本已内置 zsh 并设为默认 shell,无需安装
- 检查当前 shell:
echo $SHELL - 如需切换到 zsh:
chsh -s $(which zsh)
Ubuntu/Linux:
# Ubuntu/Debian
sudo apt update
sudo apt install zsh

# 设置 zsh 为默认 shell
chsh -s $(which zsh)
注销并重新登录后生效。
1.1.2 安装 oh-my-zsh
sh -c "$(curl -fsSL https://raw.githubusercontent.com/ohmyzsh/ohmyzsh/master/tools/install.sh)"未科学上网可使用
sh -c "$(curl -fsSL https://gitee.com/mirrors/oh-my-zsh/raw/master/tools/install.sh)"1.2 插件配置
zsh-autosuggestions和zsh-syntax-highlighting插件安装
git clone https://github.com/zsh-users/zsh-autosuggestions.git ${ZSH_CUSTOM:-~/.oh-my-zsh/custom}/plugins/zsh-autosuggestions
git clone https://github.com/zsh-users/zsh-syntax-highlighting.git ${ZSH_CUSTOM:-~/.oh-my-zsh/custom}/plugins/zsh-syntax-highlighting~/.zshrc中配置插件:
plugins=(
    git
    zsh-autosuggestions
    zsh-syntax-highlighting
)
1.3 zsh 配置优化
在~/.zshrc的最后加上setopt NO_NOMATCH,以解决当使用zsh的通配符(如*)但没有匹配任何文件时,zsh会报错zsh: no matches found的问题。
zsh 通配符展开 (Globbing)
zsh 提供了强大而灵活的通配符展开机制,通过不同的 setopt 选项可以改变其行为。
- 默认行为 (
NOMATCH): 默认情况下,如果一个通配符模式(如*.txt)没有匹配到任何文件,zsh 会报错no matches found并中断命令。这是一种安全机制,可以防止rm *.nonexistent这样的命令意外地尝试删除一个名为*.nonexistent的文件。 NO_NOMATCH: 当你设置setopt NO_NOMATCH,如果没有匹配项,zsh 会将通配符模式本身(例如,字面字符串*.txt)传递给命令。因此,ls *.txt在没有匹配时会由ls而不是zsh报告 “No such file or directory”。- …
2. Prompt 层:提示符美化
Shell 的提示符(Prompt)负责显示命令行前的状态信息(如当前目录、Git 状态、环境信息等),是终端体验的重要组成部分。
2.1 powerlevel10k 主题(当前使用)
2.1.1 字体安装
MesloLGS NF字体安装,下载这四个 ttf 文件:
双击每个文件,然后点击"安装"。这将使 MesloLGS NF 字体在系统上的所有应用程序中可用。
后边将在终端模拟器Alacritty的配置文件中配置Alacritty使用MesloLGS NF字体。
2.1.2 安装和配置
为zsh安装powerlevel10k主题:
git clone --depth=1 https://github.com/romkatv/powerlevel10k.git ${ZSH_CUSTOM:-$HOME/.oh-my-zsh/custom}/themes/powerlevel10k在~/.zshrc中设置ZSH_THEME="powerlevel10k/powerlevel10k"。
执行exec zsh重启zsh,如果配置向导没有自动启动,请输入 p10k configure。
按照配置向导定制主题配置。
升级可用:
git -C ${ZSH_CUSTOM:-$HOME/.oh-my-zsh/custom}/themes/powerlevel10k pull注意在~/.zshrc的最后一行加上下面的配置,禁用为每个终端都启动的gitstatusd进程:
POWERLEVEL9K_DISABLE_GITSTATUS=true2.2 Starship(替代方案)
Starship 是一个跨 shell 的现代化 prompt 系统,用 Rust 开发,具有以下特点:
- 跨平台跨 Shell:支持 zsh、bash、fish、PowerShell 等所有主流 shell
- 高性能:启动快速、响应迅速
- 配置简单:单个
starship.toml配置文件 - 功能丰富:支持 Git 状态、运行时版本、k8s context、电池状态等数百个模块
- 高度可定制:模块化设计,可自由启用/禁用、调整样式
Starship vs powerlevel10k
- powerlevel10k:zsh 专用,功能强大,配置向导友好,社区成熟
- Starship:跨 shell 通用,配置更简洁,性能更优,适合多 shell 用户
如果你只用 zsh 且满意 powerlevel10k,无需切换;如果你需要在多个 shell 间保持一致体验,Starship 是更好的选择。
参考文档:Starship 官方文档
3. Terminal Emulator 层:终端模拟器
终端模拟器(Terminal Emulator)是提供终端窗口、渲染、输入输出的应用程序。不同的终端模拟器在性能、功能、UI 体验上有显著差异。
3.1 Alacritty(当前使用)
brew install --cask alacritty配置文件.config/alacritty目录下:
使用了hardhackerlabs的theme-alacritty主题hardhacker.toml:
[colors.bright]
black = "0x3f3951"
blue = "0xb1baf4"
cyan = "0xb3f4f3"
green = "0xb1f2a7"
magenta = "0xe192ef"
red = "0xe965a5"
white = "0xeee9fc"
yellow = "0xebde76"

[colors.cursor]
cursor = "0xeee9fc"
text = "0xeee9fc"

[colors.normal]
black = "0x282433"
blue = "0xb1baf4"
cyan = "0xb3f4f3"
green = "0xb1f2a7"
magenta = "0xe192ef"
red = "0xe965a5"
white = "0xeee9fc"
yellow = "0xebde76"

[colors.primary]
background = "0x282433"
foreground = "0xeee9fc"alacritty.toml:
[general]
import = ["/Users/<YourName>/.config/alacritty/hardhacker.toml"]
working_directory = "/Users/<YourName>/Desktop"

[env]
TERM = "xterm-256color"

[font]
size = 15.0

[font.bold]
family = "MesloLGS NF"
style = "Bold"

[font.bold_italic]
family = "MesloLGS NF"
style = "Bold Italic"

[font.italic]
family = "MesloLGS NF"
style = "Italic"

[font.normal]
family = "MesloLGS NF"
style = "Regular"

[window]
decorations = "transparent"
startup_mode = "Maximized"

[window.padding]
x = 5
y = 30
Alacritty 特点:
- GPU 加速渲染:使用 OpenGL 渲染,追求最快的响应速度和最低延迟
- 极简设计:不内建 tabs/splits,把这些功能留给 tmux 等终端复用器
- 跨平台:Linux、macOS、Windows 全支持
- 配置驱动:通过 TOML 文件配置,无 GUI 设置界面
- Rust 开发:性能优秀、内存安全
参考文档:Alacritty GitHub
3.2 Ghostty(关注中)
Ghostty 是一个新兴的现代化终端模拟器,用 Zig 开发,具有以下特点:
- 原生 UI 整合:在 macOS/Linux/Windows 上都有良好的原生体验
- 功能丰富:内建 tabs、splits、主题系统、graphics 协议支持
- 高性能:启动快速、内存占用低、GPU 加速渲染
- 现代特性:支持多种现代终端协议和功能
- 配置友好:提供更现代的配置方式
Alacritty vs Ghostty
- Alacritty:极简主义、追求纯粹性能、依赖 tmux 等外部工具实现复杂功能
- Ghostty:功能完整、开箱即用、更好的原生 UI 整合
如果你偏好 Unix 哲学(单一工具做好一件事,配合其他工具组合),选 Alacritty + tmux; 如果你希望开箱即用的完整体验,可以关注 Ghostty。
参考文档:Ghostty 官方网站
4. 终端复用:tmux
终端复用器(Terminal Multiplexer)允许你在一个终端窗口中管理多个会话、窗口和面板,是提升终端效率的重要工具。
brew install tmux4.1 插件管理器 tpm
git clone https://github.com/tmux-plugins/tpm ~/.tmux/plugins/tpm4.2 配置文件
配置文件~/.tumx.conf:
set -g pane-scrollbars modal
set -g pane-scrollbars-position right
set -g pane-scrollbars-style fg=colour248,bg=colour236
set -g pane-border-status bottom
set -g pane-border-format " #{pane_index} #{pane_current_command}"
set-option -g mouse on
#set-option default-terminal "xterm-256color"
set -g default-terminal "tmux-256color"
set -g display-panes-time 3000 # PREFIX-Q 显示编号的驻留时长,单位 ms
set -g renumber-windows on # 关掉某个窗口后,编号重排
# https://draculatheme.com/tmux
set -g @plugin 'dracula/tmux'
set -g @dracula-plugins "custom:mymacos.sh"
set -g @dracula-show-powerline true
set -g @dracula-refresh-rate 120
set -g @dracula-show-left-icon session
set -g @dracula-border-contrast true
set -g @dracula-left-icon-padding 0
set -g @dracula-show-empty-plugins false
#set -g @dracula-show-left-sep
#set -g @dracula-show-right-sep
set -g @plugin 'tmux-plugins/tpm'
set -g @plugin 'tmux-plugins/tmux-sensible'
run '~/.tmux/plugins/tpm/tpm'上面的配置文件对tmux做了基本的配置,并将使用tpm安装了主题插件dracula/tmux。
使用下面的命令安装插件。
tmux new -t mac

tmux source ~/.tmux.conf按tmux前缀键control+b,再按Shift + I即可自动安装配置文件中配置的插件。
custom:mymacos.sh
custom:mymacos.sh是dracula/tmux主题的一个自定义插件,可以用来在tmux状态栏中显示自定义信息。
将下面的脚本内容保存到~/.tmux/plugins/dracula/custom目录下,并命名为mymacos.sh,并赋予可执行权限chmod u+x mymacos.sh。
mymacos.sh
#!/bin/bash
get_memory_info() {
local mem_output="$1"
local page_size active_pages wired_pages
page_size=$(echo "$mem_output" | grep "page size of" | sed 's/.*page size of \([0-9]*\).*/\1/')
active_pages=$(echo "$mem_output" | grep "Pages active:" | awk '{print $3}')
wired_pages=$(echo "$mem_output" | grep "Pages wired down:" | awk '{print $4}')
if [[ -n "$page_size" && -n "$active_pages" && -n "$wired_pages" ]]; then
awk "BEGIN {
used = ($active_pages + $wired_pages) * $page_size / 1024 / 1024 / 1024
printf(\"%.1f\", used)
}"
else
echo "N/A"
fi
}
get_memory_pressure_icon() {
local mem_output="$1"
local free_percentage swapouts icon
free_percentage=$(echo "$mem_output" | grep "System-wide memory free percentage:" | awk '{print $5}' | tr -d '%')
if [[ -n "$free_percentage" ]]; then
if (( free_percentage >= 50 )); then
icon=""
elif (( free_percentage >= 20 )); then
icon=""
else
icon=""
fi
else
swapouts=$(echo "$mem_output" | grep "Swapouts:" | awk '{print $2}')
if [[ -n "$swapouts" ]]; then
if (( swapouts < 1000 )); then
icon=""
elif (( swapouts < 10000 )); then
icon=""
else
icon=""
fi
else
icon=""
fi
fi
echo "$icon"
}
get_cpu_usage() {
local cpu_line user idle
cpu_line=$(top -l 1 | grep "CPU usage")
user=$(echo "$cpu_line" | awk -F'[:,]' '{print $2}' | tr -d ' user')
idle=$(echo "$cpu_line" | awk -F'[:,]' '{print $4}' | tr -d ' idle')
echo "$user $idle"
}
get_load_avg() {
sysctl -n vm.loadavg | sed 's/[{}]//g' | awk '{printf "%.2f %.2f %.2f\n", $1, $2, $3}'
}
main() {
local mem_output mem_used mem_icon cpu usage load
mem_output=$(memory_pressure)
mem_used=$(get_memory_info "$mem_output")
mem_pressure_icon=$(get_memory_pressure_icon "$mem_output")
cpu_usage=$(get_cpu_usage)
load=$(get_load_avg)
echo "${mem_pressure_icon} ${mem_used}G $cpu_usage $load"
}注意:ssh连接旧版终端
如果在tmux下SSH到较旧版本的Linux(如CentOS7)时报错:
'tmux-256color': unknown terminal type.可以通过以下方式临时解决,覆盖~/.tmux.conf:
export TERM=xterm-256color这将把终端类型设置为 xterm-256color,以避免兼容性问题。
4.3 tmux 快捷键
| 快捷键 | 功能 |
|---|---|
Ctrl + b, space | 循环切换window内预设布局, 多按几次 |
Ctrl + b, { | 将当前pane与左侧pane交换位置 |
Ctrl + b, } | 将当前pane与右侧pane交换位置 |
Ctrl + b c | 创建一个window |
Ctl + b, , | 重命名window |
Ctl + b :join-pane -t :1 | 将当前 pane 移动到目标window 1| |
5. 编辑器主题:vim 高亮
在终端中使用 vim 编辑器时,配置合适的主题可以提供更好的代码阅读体验。
使用 hardhackerlabs 的 vim 主题:
git clone https://github.com/hardhackerlabs/theme-vim.git
cp -r theme-vim/colors  ~/.vim/
cp -r theme-vim/autoload  ~/.vim/
配置 vi ~/.vimrc:
syntax      enable
syntax      on
set         t_Co=256
" let g:hardhacker_darker = 1
colorscheme hardhacker


" 解决插入模式下delete/backspce键失效问题
set backspace=2