1.环境信息
本文将实践使用Heml在Kubernetes 1.13上安装Istio 1.0.5,具体的环境信息如下:
helm version
Client: &version.Version{SemVer:"v2.12.2", GitCommit:"7d2b0c73d734f6586ed222a567c5d103fed435be", GitTreeState:"clean"}
Server: &version.Version{SemVer:"v2.12.2", GitCommit:"7d2b0c73d734f6586ed222a567c5d103fed435be", GitTreeState:"clean"}

kubectl version
Client Version: version.Info{Major:"1", Minor:"13", GitVersion:"v1.13.2", GitCommit:"ddf47ac13c1a9483ea035a79cd7c10005ff21a6d", GitTreeState:"clean", BuildDate:"2018-12-03T21:04:45Z", GoVersion:"go1.11.2", Compiler:"gc", Platform:"linux/amd64"}
Server Version: version.Info{Major:"1", Minor:"13", GitVersion:"v1.13.2", GitCommit:"cff46ab41ff0bb44d8584413b598ad8360ec1def", GitTreeState:"clean", BuildDate:"2019-01-10T23:28:14Z", GoVersion:"go1.11.4", Compiler:"gc", Platform:"linux/amd64"}
下载并解压缩istio的发布包:
wget https://github.com/istio/istio/releases/download/1.0.5/istio-1.0.5-linux.tar.gz
tar -zxvf istio-1.0.5-linux.tar.gz
cd istio-1.0.5
解压后的目录结构如下:
istio-1.0.5
├── bin
│   └── istioctl
├── install
│   ├── consul
│   ├── gcp
│   ├── kubernetes
│   ├── README.md
│   └── tools
├── istio.VERSION
├── LICENSE
├── README.md
├── samples
│   ├── bookinfo
│   ├── certs
│   ├── CONFIG-MIGRATION.md
│   ├── health-check
│   ├── helloworld
│   ├── httpbin
│   ├── https
│   ├── kubernetes-blog
│   ├── rawvm
│   ├── README.md
│   ├── sleep
│   └── websockets
└── tools
    ├── adsload
    ├── cache_buster.yaml
    ├── convert_perf_results.py
    ├── deb
    ├── dump_kubernetes.sh
    ├── githubContrib
    ├── hyperistio
    ├── istio-docker.mk
    ├── license
    ├── perf_istio_rules.yaml
    ├── perf_k8svcs.yaml
    ├── perf_setup.svg
    ├── README.md
    ├── rules.yml
    ├── run_canonical_perf_tests.sh
    ├── setup_perf_cluster.sh
    ├── setup_run
    ├── update_all
└── vagrant- 其中
istio-1.0.5/install/kubernetes/helm包含了使用helm安装istio所需的chart - bin目录中的
istioctl是istio的客户端文件,用来手动将Envoy作为sidecar proxy注入,以及对路由规则和策略的管理
将istioctl加入到PATH环境变量,这里直接将其拷贝到/usr/local/bin下:
istioctl version
Version: 1.0.5
GitRevision: c1707e45e71c75d74bf3a5dec8c7086f32f32fad
User: root@6f6ea1061f2b
Hub: docker.io/istio
GolangVersion: go1.10.4
BuildStatus: Clean
2.使用Helm安装Istio
因为这里的Helm是2.12.2版本高于2.10,所以不再需要手动使用kubectl安装Istio的CRD。
Istio的Chart在istio-1.0.5/install/kubernetes/helm目录中,这个Chart包含了下面的组件:
- ingress
- ingressgateway
- egressgateway
- sidecarInjectorWebhook
- galley
- mixer
- pilot
- security(citadel)
- grafana
- prometheus
- servicegraph
- tracing(jaeger)
- kiali
通过各个组件在vaule file的enabled flag启用或禁用,下面创建名称为istio.yaml的vaule file,将几个默认禁用的组件也启用:
tracing:
  enabled: true
servicegraph:
  enabled: true
kiali:
  enabled: true
grafana:
  enabled: true
直接使用helm安装Istio。
helm install install/kubernetes/helm/istio --name istio --namespace istio-system -f istio.yaml安装完成后确认各个组件的Pod正常运行:
 kubectl get pod -n istio-system
NAME                                      READY   STATUS    RESTARTS   AGE
grafana-59b8896965-lngmf                  1/1     Running   0          43m
istio-citadel-856f994c58-q7km9            1/1     Running   0          43m
istio-egressgateway-5649fcf57-m52zh       1/1     Running   0          43m
istio-galley-7665f65c9c-2xh59             1/1     Running   0          43m
istio-ingressgateway-6755b9bbf6-x5gzb     1/1     Running   0          43m
istio-pilot-56855d999b-rh7w7              2/2     Running   0          43m
istio-policy-6fcb6d655f-7dfd5             2/2     Running   0          43m
istio-sidecar-injector-768c79f7bf-7887s   1/1     Running   0          43m
istio-telemetry-664d896cf5-wnfg4          2/2     Running   0          43m
istio-tracing-6b994895fd-m9j2s            1/1     Running   0          43m
kiali-67c69889b5-2lvq5                    1/1     Running   0          43m
prometheus-76b7745b64-5z2cw               1/1     Running   0          43m
servicegraph-5c4485945b-gcrj8             1/1     Running   0          43m
3.使用Istio Gateway暴露各个辅助组件
完成Istio的安装后,可以看到安装的组件除了Istio架构中的数据平面和控制平面的各个核心组件,详见Istio 1.0学习笔记(五):Istio的基本概念外,还部署了Prometheus、Grafana、Jaeger、Kiali等辅助组件。 在云原生生态中,我们已经对这些组件很熟悉了。
- Prometheus:监控系统,收集Istio的监控数据
- Grafana:监控信息的图表展现,Istio部署的Grafana为我们内置各个组件相关的Dashboard
- Jaeger:分布式跟踪系统,Istio中集成Jaeger可以对基于Istio的微服务实现调用链跟踪、依赖分析,为性能管理提供支持
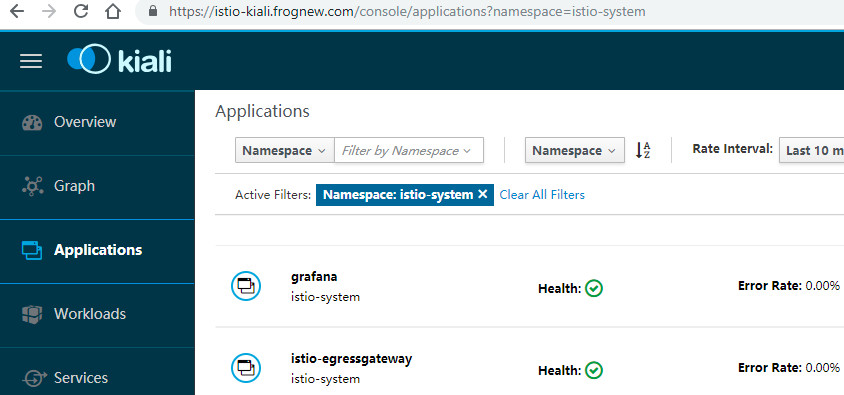
- kiali:kiali作为Istio的可观测工具,可以认为是Istio的UI,可以展现服务的网络拓扑、服务的容错情况(超时、重试、短路等)、分布式跟踪(通过Jaeger Tracing)等
这些辅助组件都有自己的web界面,这里我们使用Isito Gateway的方式将这些组件暴露到集群外,以便在集群外部访问。
3.1 准备工作,配置istio-ingressgateway
在Kubernetes中,可以使用Ingress资源将集群内部的Service暴露到集群外部,而Istio这个Service Mesh则推荐使用另Istio Gateway这个更好的配置模型。
我们首先确保Istio Gateway被暴露到集群外部。这个和Kubernetes中暴露Ingress Controller类似,有很多种方式,如NodePort,LoadBalancer,或直接开启hostNetwork: true等等。
这里我们使用以hostNetwork: true运行Istio Gateway容器。因为istio 1.0.5的helm chart中创建的 istio-ingressgateway Service是LoadBalancer类型的,而且开放了很多NodePort,同时没有提供hostNetwork相关选项。我们这里通过kubect edit命令重新配置Istio Gateway的Deloyment和Service.
修改istio-ingressgateway的Service,将类型改成ClusterIP,并删除各个nodePort:
kubectl edit svc istio-ingressgateway -n istio-system

......
spec:
  type: ClusterIP
  ......
  ports:
  - name: http2
    port: 80
    protocol: TCP
    targetPort: 80
  - name: https
    port: 443
    protocol: TCP
    targetPort: 443
  - name: tcp
    port: 31400
    protocol: TCP
    targetPort: 31400
  - name: tcp-pilot-grpc-tls
    port: 15011
    protocol: TCP
    targetPort: 15011
  - name: tcp-citadel-grpc-tls
    port: 8060
    protocol: TCP
    targetPort: 8060
  - name: tcp-dns-tls
    port: 853
    protocol: TCP
    targetPort: 853
  - name: http2-prometheus
    port: 15030
    protocol: TCP
    targetPort: 15030
  - name: http2-grafana
    port: 15031
    protocol: TCP
    targetPort: 15031
......修改istio-ingressgateway的Deployment,针对spec.template.spec设置hostNetwork: true、dnsPolicy: ClusterFirstWithHostNet。同时加入节点亲和性nodeAffinity,Pod反亲和性podAntiAffinity等配置确保istio-ingressgateway容器被调度到集群中的边缘节点上。
kubectl edit deploy istio-ingressgateway -n istio-system

apiVersion: extensions/v1beta1
kind: Deployment
metadata:
......
spec:
  replicas: 2
  ......
  template:
    spec:
      ......
      hostNetwork: true
      dnsPolicy: ClusterFirstWithHostNet
      affinity:
        nodeAffinity:
          requiredDuringSchedulingIgnoredDuringExecution:
            nodeSelectorTerms:
            - matchExpressions:
              - key: node-role.kubernetes.io/edge
                operator: Exists
        podAntiAffinity:
            requiredDuringSchedulingIgnoredDuringExecution:
            - labelSelector:
                matchExpressions:
                - key: app
                  operator: In
                  values:
                  - istio-ingressgateway
                - key: istio
                  operator: In
                  values:
                  - ingressgateway
              topologyKey: kubernetes.io/hostname
      tolerations:
          - key: node-role.kubernetes.io/master
            operator: Exists
            effect: NoSchedule
这样从集群外部访问Istio Gateway的IP地址就是边缘节点的IP地址了,如果有多个边缘节点,可以使用Keepalived实现多个边缘节点争抢一个VIP的形式,实现高可用。这个和Kubernetes Ingress边缘节点高可用实现方式一致,这里不再赘述,可参考Bare metal环境下Kubernetes Ingress边缘节点的高可用,Ingress Controller使用hostNetwork。
注意因为helm部署的istio-ingressgateway,同时为其创建了HPA,因为我们这里使用hostNetwork,即将istio-ingressgateway固定调度到集群中的所有边缘节点上,所以还需要手动删除这个HPA:
kubectl delete HorizontalPodAutoscaler istio-ingressgateway -n istio-system接下来将所需要的SSL证书存放到istio-system命名空间中,要求名称必须是istio-ingressgateway-certs:
kubectl create secret tls istio-ingressgateway-certs --cert=fullchain.pem --key=privkey.pem -n istio-system3.2 创建各个组件所需要的gateway
apiVersion: networking.istio.io/v1alpha3
kind: Gateway
metadata:
  name: frognew-gateway
  namespace: istio-system
spec:
  selector:
    istio: ingressgateway
  servers:
  - port:
      number: 80
      name: http
      protocol: HTTP
    tls:
      httpsRedirect: true
    hosts:
    - istio-prometheus.frognew.com
    - istio-grafana.frognew.com
    - istio-jaeger.frognew.com
    - istio-kiali.frognew.com
  - port:
      number: 443
      name: https
      protocol: HTTPS
    tls:
      mode: SIMPLE
      serverCertificate: /etc/istio/ingressgateway-certs/tls.crt
      privateKey: /etc/istio/ingressgateway-certs/tls.key
    hosts:
    - istio-prometheus.frognew.com
    - istio-grafana.frognew.com
    - istio-jaeger.frognew.com
    - istio-kiali.frognew.com
3.3 使用istio gateway暴露Prometheus
创建Prometheus的VirtualService:
apiVersion: networking.istio.io/v1alpha3
kind: VirtualService
metadata:
  name: prometheus
  namespace: istio-system
spec:
  hosts:
  - istio-prometheus.frognew.com
  gateways:
  - frognew-gateway
  http:
  - match:
    - uri:
        prefix: /
    route:
    - destination:
        port:
          number: 9090
        host: prometheus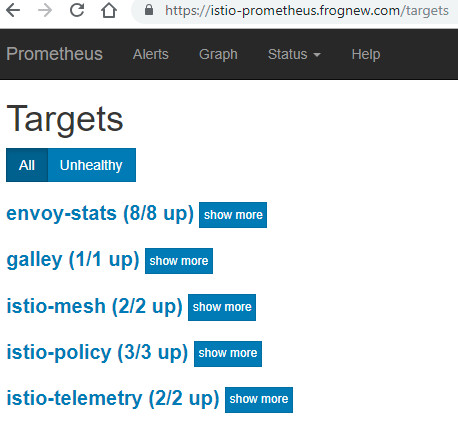
3.4 使用istio gateway暴露Grafana
创建Grafana的VirtualService:
apiVersion: networking.istio.io/v1alpha3
kind: VirtualService
metadata:
  name: grafana
  namespace: istio-system
spec:
  hosts:
  - istio-grafana.frognew.com
  gateways:
  - frognew-gateway
  http:
  - match:
    - uri:
        prefix: /
    route:
    - destination:
        port:
          number: 3000
        host: grafana
3.5 使用istio gateway暴露Jaeger
创建Jaeger的VirtualService:
apiVersion: networking.istio.io/v1alpha3
kind: VirtualService
metadata:
  name: jaeger-query
  namespace: istio-system
spec:
  hosts:
  - istio-jaeger.frognew.com
  gateways:
  - frognew-gateway
  http:
  - match:
    - uri:
        prefix: /
    route:
    - destination:
        port:
          number: 16686
        host: jaeger-query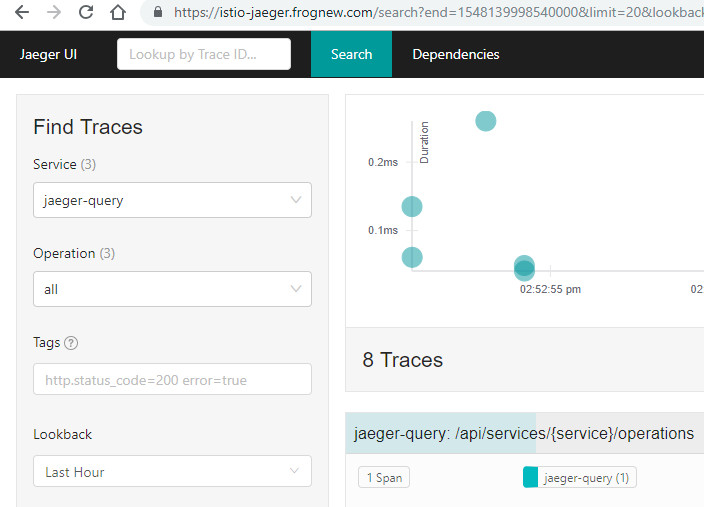
3.6 使用istio gateway暴露Kiali
创建Kiali的VirtualService:
apiVersion: networking.istio.io/v1alpha3
kind: VirtualService
metadata:
  name: kiali
  namespace: istio-system
spec:
  hosts:
  - istio-kiali.frognew.com
  gateways:
  - frognew-gateway
  http:
  - match:
    - uri:
        prefix: /
    route:
    - destination:
        port:
          number: 20001
host: kiali默认用户名密码admin/admin。
3.7 使用istio gateway暴露k8s dashboard
因为我们不再使用Kubernetes的Ingress Nginx,而改为使用Istio Gateway,所以也需要使用istio gateway暴露k8s dashboard。
因为Kubernetes Dashboard部署在kube-system命名空间中,所以需要在kube-system命名空间中创建Gateway:
创建kube-system命名空间中的Gateway资源:
apiVersion: networking.istio.io/v1alpha3
kind: Gateway
metadata:
  name: frognew-gateway
  namespace: kube-system
spec:
  selector:
    istio: ingressgateway
  servers:
  - port:
      number: 80
      name: http
      protocol: HTTP
    tls:
      httpsRedirect: true
    hosts:
    - k8s.frognew.com
  - port:
      number: 443
      name: https
      protocol: HTTPS
    tls:
      mode: SIMPLE
      serverCertificate: /etc/istio/ingressgateway-certs/tls.crt
      privateKey: /etc/istio/ingressgateway-certs/tls.key
    hosts:
- k8s.frognew.com可以看到Gateway中针对k8s.frognew.com启用了TLS,简单起见在集群中部署的k8s dashboard不再启用TLS,对于使用helm chart部署的dashboard,使用下面的自定义值文件即可:
enableInsecureLogin: True
image:
  repository: k8s.gcr.io/kubernetes-dashboard-amd64
  tag: v1.10.1
rbac:
  clusterAdminRole: true
创建k8s dashboard的VirtualService:
apiVersion: networking.istio.io/v1alpha3
kind: VirtualService
metadata:
  name: k8s-dashboard
  namespace: kube-system
spec:
  hosts:
  - k8s.frognew.com
  gateways:
  - frognew-gateway
  http:
  - match:
    - uri:
        prefix: /
    route:
    - destination:
        port:
          number: 443
        host: kubernetes-dashboard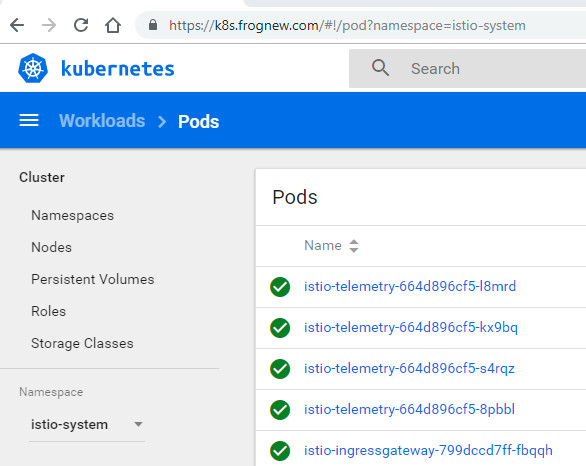
4.总结
本文实践了使用istio官方提供的helm chart在Kubernetes上部署Istio 1.0.5的过程,并使用Istio Gateway将Istio集成的Prometheus、Grafana、Jaeger、Kiali等辅助组件暴露到集群外部。 Istio Gateway用于控制边缘服务的暴露,即将服务暴露到集群(网格)外部,结合使用VirtualService对进入集群的流量进行了管理。